
(1) I am an InkNBurn Ambassador
(2) I love being wildly creative
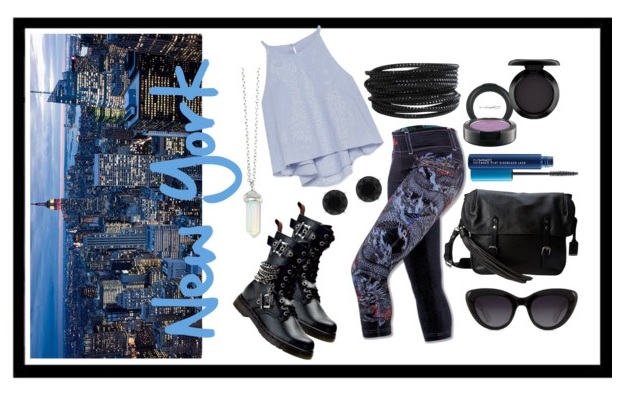
So when InkNBurn announced their latest Polyvore contest, which is centered around their new Liberty collection that launched just in time for 4th of July, you know I absolutely had to jump into the competition. (Well ... the $30 InkNBurn cash prize might have served as a bit of a motivator, too. Heh.)
Right away I ran over to Polyvore, wiped the dust off my 6 year old account, and whipped up a "set" to enter the contest.

But of course, once I got my creative juices flowing ... I just couldn't stop. With InkNBurn in hand, or rather in Polyvore, I started entering every contest on the site, prize available or not.


Of course, I was having tons of fun while doing this. But, while I was cranking away on my Polyvore creations, I started noticing on the InkNBurn fan page that others were struggling to just get up and running.
So I thought ... why not help everyone out with a basic Polyvore how-to tutorial?! Seems easy enough.
OK! Let's do it!
(PS - Polyvore works best on a desktop computer. Try your first go using that, please.)
---
Step one (this may seem obvious): create an account at Polyvore.com. Here's my account, just for fun:

Note: I'm not going to bore you with how to create an account, since I figure most of you have at least created an account or two on the internet before - be it at Facebook or LinkedIn or whatever other social media site is out there. Hopefully you can manage with me omitting this info!
Second, follow my profile.
LOL! Just kidding. Actually, though, I do want you to follow InkNBurn's profile so you can enter their July 4th contest too.
Following InkNBurn is pretty easy to do. Just go to their profile page, and click on the button that says "follow". I've pointed it out below with a red arrow.

By the way, in some of my other screen shots below (like ^that one above), look for the red arrow. I'll use that as a flag for the harder to see stuff from here on out.
Next, click on the items tab on the InkNBurn profile page and start liking InkNBurn stuff.
To like an item, simply click on the heart next to it. I recommend that you at least "heart" anything in the July 4th collection so you have options once you start playing with a design.

---
To review - so far you have set up a profile, followed InkNBurn, and hearted at least a few of their items. These three things are all important steps, so be sure you have completed them prior to continuing on. Ok? OK!
---
Now, let the fun begin!
From your main profile page, click on the "create" button in the upper right. You want to select the option called "set".

Doing so will bring you here.
*queue singing angels*
As you can tell, this is obviously my favorite part of the entire site.

From this point on, it's all about you adding whatever you want. The world is your blank canvas, and InkNBurn wants you to decorate it!
I recommend starting by pulling your InkNBurn items onto the canvas, just so you have your basics covered. For their current contest, they require 3 pieces of July 4th items. So, let's cover those bases first.
Click on your "My Items" tab and find the InkNBurn pieces you want. Then, click on them and choose "Add to Set".

There! We've got the basics of the contest covered, three pieces of July 4th themed product are in the set.
---
Hm. What next?
I know! Let's cover another basic Polyvore feature - adding text to a set. This is optional, but it is kind of a fun way to add interest and direction to your design.
Clicking on the "Fashion" tab, head on down to the "Text" option.

Scroll around until you find a font you like. I'm going to choose this option since it reminds me of fireworks.

Now, this is where I can show you a few tricks.
If you're still with me and are working on a set yourself, you probably noticed when you added your text that Polyvore added a generic quote in black text, "I Love Polyvore".
As you'll see below, I'm going to change that text to red via the drop down box.
And just next to the color drop down, in the box marked "Text", I'm going to make it say July.

Make sure you click on the word "Update" after you make your color and text selections, by the way. If you do those things, you should end up with this:

Yep, that looks good!
But ... now I want another word in the same font ... with a different color.
Let's use the clone tool and make that happen. (Note, the clone tool works for everything in your Polyvore set, not just text).

You may have noticed I skipped a few steps after cloning, editing the color and text in the above as well. When you clone, it only gives you the exact same word in the exact same size/color. You have to choose from there what you want the new word to be. Since we already covered how to do that, I'm skipping that part and saving you a repeat lesson.
---
At this point, with a few images and text added to your set, you've got the basics. Now you can start dragging around your text and images to get them wherever you desire.
You can also scale and rotate items, tweaking them to better fit your layout. To do so, just click on an item (like the word FOURTH above) and pull from one of the four corners to enlarge/shrink. Or, go to the top center point (above the OU in FOURTH) to rotate.
Using the scaling/rotating options, here's where I am so far:

Now, to emphasize that I'm head over heels for InkNBurn, I'm going to opt to flip the capris upside down. As you can see in the above, I'm working towards that by choosing the flip tool. (There's also a flop tool, but I don't need that right now. Feel free to play with it on your own).

With the flip complete, I'm ready to start searching for some items to help fill out my set. Let's get to searching!
Notice above how I've keyed in "American Flag" in the search bar? When I do that and click search, I get a whole slew of options to add to my set.
After paging through a few options, I found something that caught my eye, so I want to add it to my set.

This is where I have to say ... finding stuff on Polyvore is all about patience and trial & error. I'll show you one search trick I've used in a minute, but I have to emphasize that the art in Polyvore really comes from your ingenuity in searching. Unfortunately, a good set is usually a result of diligent searching, and that just means time spent on your end.
That being said, hopefully at this point you've found something you want to add to your set.
Go ahead. Add it. You know you want to.
Once you've added some things, start dragging those items into place, scaling and rotating as you wish.
If, like the below, you find you have some layering issues and need to move something above/below another item: click on the "offending" item and use the backwards (or forwards) tool to put the item where you want it to be. Each click will move your item up or down one level in relation to the other pieces of your set. That means, if you have 10 pcs in your set, you may need to click the tool a few times before you're happy with the layer position.

---
Ok. So now we've covered the basics of design, including layering. How about a couple of ... we'll call them semi-advanced tips?
Let's start with a more advanced search method.
In the main "Fashion" tab, click on shoes. Because shoes. OMG shoes. And also, I think this set could use some.

Since this set has a lot of blue, and I'm not particular which shoes I end up with, I'm going to focus on finding something red. Using a similar color drop down like we did when we changed our text color, let's filter our shoes for red.

Ta-da! Look at all those red shoes.
In this advanced search method, you can add additional search terms to filter further if you want - IE style of shoe (maybe you just want a sandal), brand of shoe (I'm partial to Saucony), etc. I won't use those methods here, but know that they are available to you if you wish to try them.
Anyway, I think I found a pair that will work. But ... hm. As you can see below, the positioning of the second shoe in the image seems odd when I place it into my set.
Don't you think it would look better without that second shoe in the shadows?

So, let's do something about that 2nd shoe.
As you can see above, when I clicked on the shoe, a toolbar appears on the right and gives me three options: with our with out a white background, or the third option titled "Custom".
When I click on custom, I get a ton of other pre-set options to choose from. One of those options is the shoe without it's so-called shadow.

That's exactly what I'm looking for, so I select it and click on OK. Then I head back to my set, where the shoe has been added ... with it's partner deleted from the picture.
But that's when I notice my set still has one last hole, just to the right of the sunglasses, and I need to add another image to my set. Hm. What do I use to fill that last hole? I mean ... what goes good in a hole?
Oh, I know! Cake.
Mmm. Cake.
Going back through the search options, I find a cake that I like, but unfortunately ... I really don't like the background it's on. And when I click on the custom option, none of the preset crops are what I want either.
Dang!
Going back to the shoe image above ... notice all those little gray squares around the shoe? Below, I'm going to play with those little gray squares on my cake and create a truly custom image crop.
For this example, I started with someone else's work where they cropped out just the cake. Then, I drug the points out to include the blue plate:

You could also choose to start totally from scratch, dropping dots all along the edge on your own. If you choose this method, you have to be sure to connect your end point to your beginning point prior to clicking "OK".

When you settle on how you want your cropped image to look, click on OK and add it to your set. (And don't worry, if you realized you made a mistake on your crop, you can always click on the image and get back into that screen to make adjustments).
---
So, at this point, I'm pretty much done with my design.
Where does that leave me? Well ... publishing. Which seems pretty straight forward, given the "Publish" button.

When you click on publish, make sure to choose a name and category for your set (I usually choose fashion as my category). You may get a few additional options here to post to Facebook or whatever. I typically don't do that and just click on the black X to opt out, because if I did publish all my designs, I'd be spamming everyone I know with about 100 Polyvore sets a day. Yeah, you're welcome.
Anyway, once you are done publishing, click on your profile to view your sets. There you should see your finished work appear.

Usually, after the design is done, I go in and add a comment to it that says: @InkNBurn. It may seem silly, but I do that because sometimes the staff at InkNBurn comments back on a design, so it's kind of fun to know they looked at your work.
---
So, now we've created and published a set. But, of course I haven't forgotten the entire purpose of this blog: contest submission.
To enter the contest, you need to join the InkNBurn design submissions page. Once you do that and are approved as a member, you can access the page fully.
That's when you'll see, on the far right, open contests. You click there to enter your designs.

Selecting the contest brings you to the next page, where you can opt to submit your set. Many people miss this part, so I'm going to highlight it here. (Again, accessing Polyvore from a desktop is key for this part - many people accessing from an app or mobile device claim they cannot see this option.)

And once you click on "Submit a Set", the rest is pretty easy. A pop up window comes up that lets you select which set you want to submit. Then - you click on the set you want, and you click on enter contest. Bing-bang-boom, you're in the game.
---
And well ... I guess that's about it. I hope you found this how-to guide helpful. I know I'm no Polyvore expert, but if I can at least get you up an running ... then my job is done!
Now - go forth and design some sets!
Don't forget, by the way, to check out my profile and see what July 4th entries I submitted. Or, share with me what YOU designed by pasting some links in the comments below.
I can't wait to see what you make!
You're awesome for creating this! I followed step by step. I'm brand new to this but I'm already excited to begin creating! Thank you :)
ReplyDeleteGlad to help! Good luck creating!
DeleteHi - I know you're not the Polyvore help desk or anything but just had a question. What if I wanted to add an item to my set that isn't available on the INKnBURN polyvore page? How do I grab the item off their website? I thought it might work like Pinterest but it doesn't. So I feel like I'm missing something that's probably obvious. Thanks for listening :)
ReplyDeleteThere's a clipping tool you can download on your desktop computer. Unfortunately it is not mobile friendly, at least last I checked. Which item are you looking for? I do have most of Ink's items in my favorites, though I may be missing 2-3 of their latest releases.
DeleteI checked - the clipper looks to be available at the bottom of the main page in the "Help" menu. I still can't download it on my iPad, though. Darn.
DeleteYay! Thank you so much! I'll be trying it out now.
Delete